If you have explored taking your vermicomposting beyond the hobby level, you have likely heard the terms “continuous flow through,” or CFT vermicomposting bins.
We worm people like our lingo and our terms can be a bit confusing, so this article will introduce you to the concept of continuous flow vermicomposting, provide you some examples of CFTs, and show you how the Urban Worm Company uses a commercial scale CFT to produce worm castings for sale on our site and Amazon
What is Continuous Flow Vermicomposting?
 Continuous flow is a method of vermicomposting where composting worms are fed organic matter from the top and worm castings are eventually harvested from the bottom or removed from a bottom tray. This bottom-to-top flow requires one of two things:
- a container or bin that allows for harvesting from the bottom to allow the worms working in the top layers of the bin to remain undisturbed.
- removable trays with perforated bottoms that allow for for upward migration, the assumption being that the top trays can be removed periodically to allow for the removal of lower trays that are filled with finished vermicompost.
UWC Note: My definition of “continuous flow” is a little more expansive than you might find elsewhere. The term is often reserved for larger bins, but if we are describing the process of how continuous flow works, then nearly all commercially-made worm bins – even stackable tray systems like the Worm Factory 360 – can be considered continuous flow worm bins.
Characteristics of Commercial Continuous Flow Worm Farms
While the dimensions of continuous flow bins may vary, they all employ the upward migration of worms towards fresher sources of food.
And they can feature single compartments or multiple, stacked compartments.
All commercial-scale CFTs are essentially rigid, single-compartment structures with mesh bottoms.
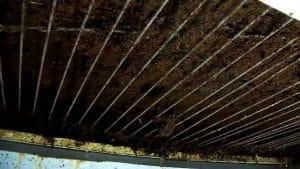
A cutting bar or “breaker” bar is pushed or pulled just above the mesh, releasing the bottom 1-2 inches of finished vermicompost through the mesh to the floor or conveyor below.
This cutting bar is powered electrically, hydraulically, or through the use of a manual winch for smaller systems.
(More rudimentary home-built systems simply use a rake or tool to loosen the castings from the bottom.)
All industrial-scale CFTs feature materials that should be highly-resistant or impervious to the moisture that is constantly present in a worm composting bin.
DIY or home-scale CFTs are generally smaller, normally less efficient, made with less hardy materials, and can be either single- or multiple-compartment bins.
As mentioned above, larger industrial-scale CFTs are single compartment bins as the harvest is made through the bottom of the CFT since the size prohibits the removal of the top layer of the CFT.
Small-scale CFTs like the Urban Worm Bag and Hungry Bin are single-compartment CFTs as well. There are no separate trays or containers that the worms are assumed to move into.
They just simply move into fresher layers of waste above them, leaving their castings behind.
Stackable bins like the Worm Factory 360, Vermihut, or DIY stacking systems made from plastic bins have several trays, i.e., multiple compartments.
Again, the assumption here is that once the worms are finished with material in one tray, that they will move into fresher food sources above.
What Are the Advantages of Continuous Flow Worm Bins?
While vermicomposting in buckets or single Rubbermaid bins can be effective, you’re stuck with a problem.
You have to separate the worms from the worm castings and undigested organic matter, often disturbing the entire ecosystem and having to restart your vermicomposting process all over again.
This is the issue with “batch” methods.
Continuous flow bins are advantageous because they:
- ease the separation of worms from castings
- save labor
- can maintain more constant conditions than outdoor systems
- allow for greater efficiency
Easier Separation of Worms From Castings
Because composting worms tend to stay in the top 6-8 inches of their habitat, a continuous flow system with an approximate depth of 20 inches or more will produce more homogenous, relatively worm-free worm castings harvest.
But a worm-free harvest – or at least a harvest that isn’t chock full of worms – is dependent upon moisture control.
Worms are attracted to moisture and if a CFT is run so wet that this moisture leaches down toward the bottom of the bin, worms will follow.
This results in a harvest so full of worms that it defeats the point of a continuous flow bin.
Continuous Flow Bins Save Labor
While most commercial operators still have to screen their finished castings to remove coarser materials and maybe a few worms, a continuous flow bin can save a lot of labor as the bin should never have to be emptied and restarted like batch methods must be.
So your continuous flow bin, sometimes referred to as a continuous flow “reactor,” should stay working and producing finished vermicompost with a minimum of labor.
Easier to Maintain Constant Conditions
Another advantage of continuous flow worm farms, especially in relation to outdoor windrows, is the ability to maintain constant conditions.
A vermicomposting system exposed to the elements and in contact with the ground is subject to varying climate conditions, precipitation, infestation by pests, and runoff from the area around it.
Continuous Flow Bins Are More Efficient Than Batch Systems
A worm bin of any size is an ecosystem of worms, bacteria, fungi, possibly arthropods, and other decomposers.
A batch system like a windrow or a simple Rubbermaid bin may require you to completely disturb or even destroy this ecosystem to remove finished vermicompost.
But a continuous flow worm bin allows for harvesting without disturbing the ecosystem above it.
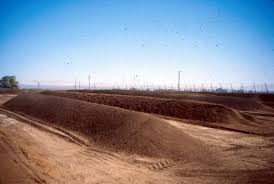
To give you an example, I saw some sample data from a California-based vermicomposter who ran a series of windrows (long piles on the ground) on a 5-acre property, harvesting each of them twice per year. He netted 800 cubic yards of worm castings out of 36,000 square feet of windrows, for a “whopping” .02 cubic yards per square foot per year.
Conservatively, out of my Michigan SoilWorks CFT which I’ll introduce below, I will get .33 cubic yards, or over 16x more worm castings per square foot than this particular windrow operation.
Disadvantages of Continuous Flow Worm Bins

Upfront Cost
The clear disadvantage of a continuous flow worm bin is the upfront cost.
Any business has to balance the tradeoff between capital equipment and labor; decreasing one typically necessitates an increase in the other.
At a starting price of around $5000 for the smallest commercial-grade CFT, the price tag is steep.
Lack of Mobility
Another disadvantage is the immobility of larger CFTs.
The CFT itself is heavy, bulky, and difficult to move.
A CFT filled with moist vermicompost is as close to an immoveable object as you’re going to find!
When Worms Don’t Behave Like We Think They Should
The main advantage of a CFT is the ease of harvesting completely or mostly worm-free castings.
But worms, like children, spouses, and tax collectors, don’t always behave like we think they should.
A CFT that is either overfed or overwatered can feature lots of worms in the bottom that will be found in the harvest. Composting worms need to be given a reason to leave their current environment. And as they are attracted to decomposing organic waste AND moisture, they may not see the reason to move into that layer of waste above them if they aren’t finished with their current meal.
More important than the freshness of the waste is the moisture, in my opinion. Even with a smorgasbord above them, if the bottom of any CFT is a swamp, they will stay put stubbornly – and happily.
This is why owners of stackable bins like the Worm Factory 360 complain that the worms don’t move into the higher trays, especially if they are getting leachate from the “tap” on the bottom of their bin. If a Worm Factory is running so wet as to produce leachate, it is unlikely that the worms will move into the trays above them.
Even Urban Worm Bag owners find lots of worms in their harvests if the bottom is too wet.
Bottom line, if a continuous flow bin is producing leachate, it is likely no longer providing the benefits of continuous flow.
What Are Some Examples of Continuous Flow Vermicomposting Systems?
As mentioned above, “continuous flow” describes a method or a process rather than a particular product or machine.
And that process can be put to work in variety of ways, from a DIY solution to a product like the Urban Worm Bag, to advanced hobbyist solutions, to commercial-scale bins.
Home Use Continuous Flow Bins
While CFTs are often associated with mid- to large-scale operations, there are several home worms bins more appropriate for home use that employ the continuous flow concept.
Urban Worm Bag
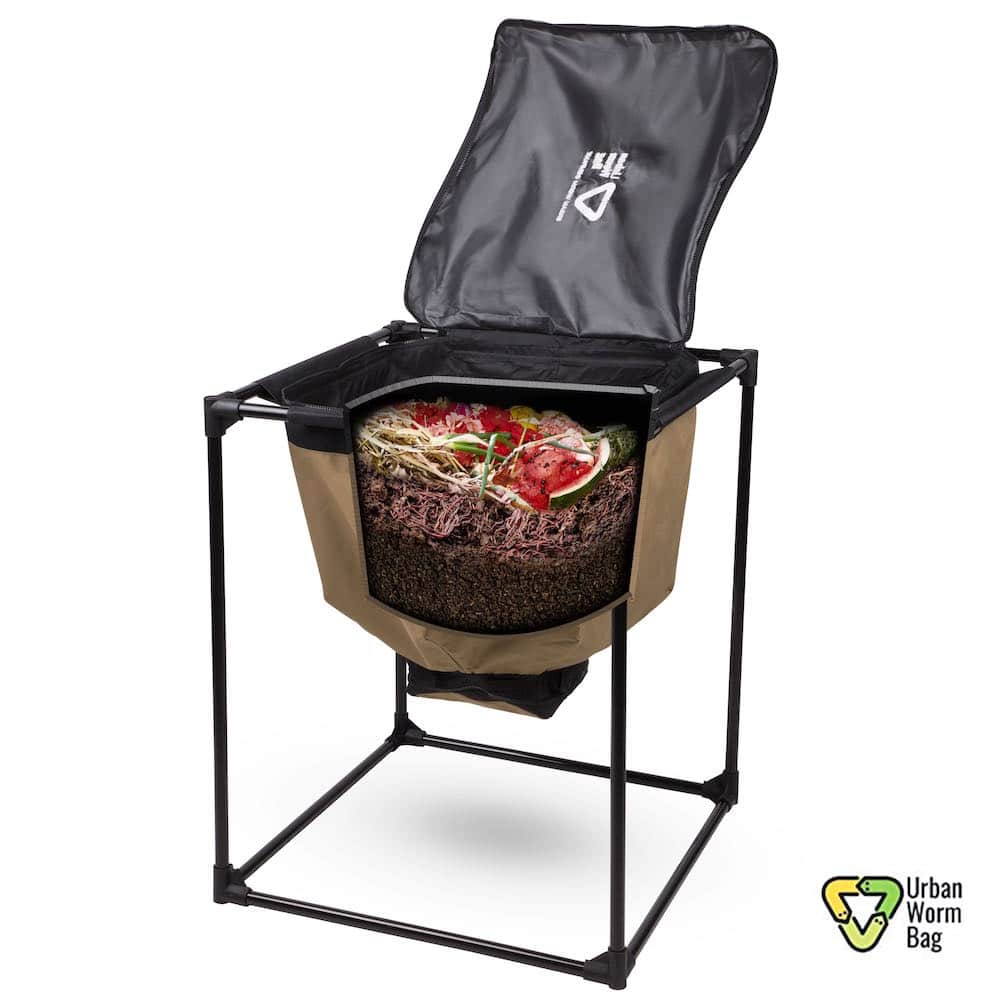 My most favorite home-use bin, of course, is the Urban Worm Bag, a fabric continuous flow bin suspended from an iron frame. You feed organic waste through the top and collect worm castings through the bottom 4-6 months later.
With 4 square feet of vermicomposting area, the “UWB” is large by home worm bin standards but can yield up to 1.5 gallons of vermicompost per week under optimal conditions.
I began manufacturing the Urban Worm Bag in late 2017 and released Version 2 in late 2018. The feedback has been excellent and I am striving to continually make the Urban Worm Bag the baddest home bin on the market!
Hungry Bin
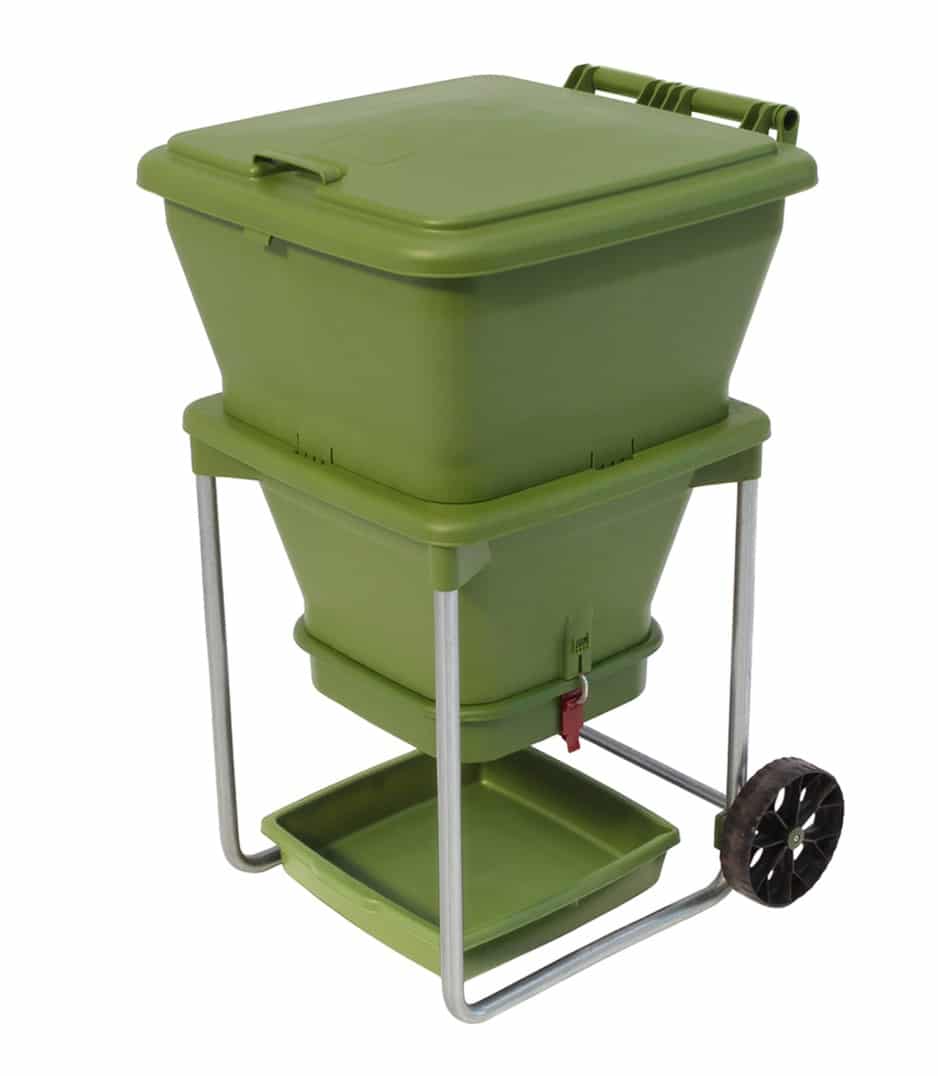 The Hungry Bin is an all-plastic continuous flow bin made in New Zealand.
The Hungry Bin features a slightly greater volume than the Urban Worm Bag and is also mobile, which is a nice perk. But with a price tag of around $340, the Hungry Bin is over 2.5 times as expensive as the Urban Worm Bag.
Most negative feedback I’ve seen centers around the very wet castings produced by the Hungry Bin as its all-plastic walls construction does not allow for respiration and aerobic conditions. But it also has some enthusiastic fans.
Vermibag
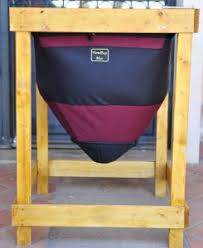 The Vermibag is another popular fabric bag product. The Vermibag is handmade and considered a little more breathable than the Urban Worm Bag and much more breathable than the Hungry Bin.
The Vermibag comes in various sizes, but also requires owners to craft their own frames.
Commercial Scale CFTs
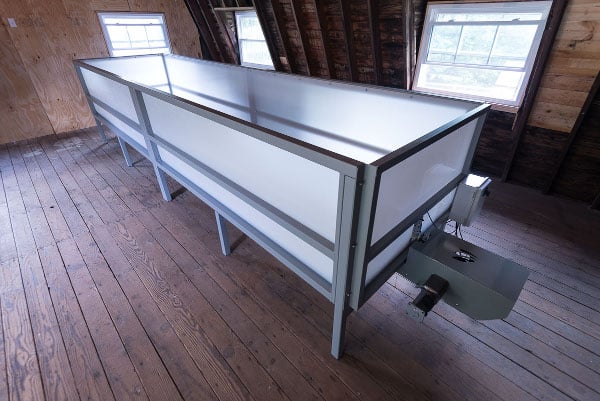
Michigan SoilWorks CFT
Dan Lonowski, a retired automotive R&D engineer, manufactures this CFT near Detroit, MI using precision-engineered components. There are no off-the-shelf parts, and Dan has painstakingly designed this product to last for a very long time.

With powdercoated structural steel, a galvanized mesh bottom, custom DC motor, and a patented stainless steel cutting bar assembly, this is the top CFT currently available to the mass market.
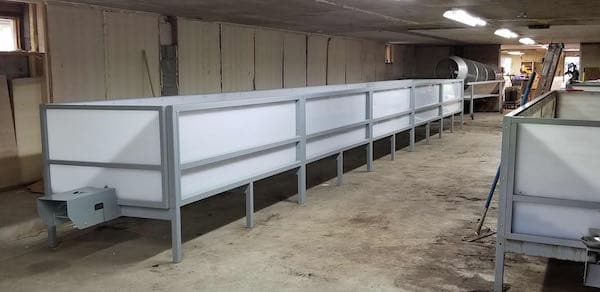 An absolutely huge advantage of this product is that it is modular and thus, expandable through the addition of modules that can be purchases in the future. So if you have dreams of a 40-footer, but can’t afford to buy one now, you can start with a single-module 8-ft CFT and expand your operation as your business or operation grows.
Although it’s not cheap – sticker price for a base model is over $5000 – I am a very happy owner of a 16-ft Michigan SoilWorks CFT and am currently producing worm castings with wood chips and spent brewer’s grains precomposted in my custom aerated static pile system.
How We Operate Our Commercial Scale CFT
As mentioned earlier, I operate a 16-ft Michigan SoilWorks CFT. While I installed it in September 2018, I didn’t begin using it until nearly a year later.
Why?
Well a commercial-scale CFT requires a commercial-scale input of organic waste. And managing waste measured in cubic yards as opposed to handfuls presents a bit of a challenge.
In a small, enclosed home worm bin, you can feed it organic waste directly from your kitchen or office directly to the bin. For a larger operation, this “hand to mouth” feeding is unmanageable for a multitude of reasons:
- Storing the waste without attracting birds, pests, or other vectors or creating foul odors is difficult.
- Large amounts of fresh, nitrogen-rich organic waste will rot and/or create heat in a worm composting system, creating toxic conditions for the worms.
- For operators who want to sell their castings, state and local regulations will likely require a pathogen-free product.
So nearly all operators beyond the hobby level must engage in “pre-composting,” which involves a hot, or thermophilic composting process to reduce the volume and energy organic waste while also raising its carbon-to-nitrogen ratio.
While the hot composting process can take 3-4 weeks or longer, by keeping the temperatures above 131F for at least 3 days in an aerated static pile, or 15 days in a turned windrow, composters can comply with PFRP (Processes to Further Reduce Pathogens) standards to ensure a massive reduction or elimination of pathogens in the compost.
So for my own operation – which happens to be in a residential area – I had no effective way to precompost waste for my CFT. Wanting to make sure I could keep a continuous supply of feedstock for my own CFT, I knew I had to build a composting system of some sort before using the CFT.
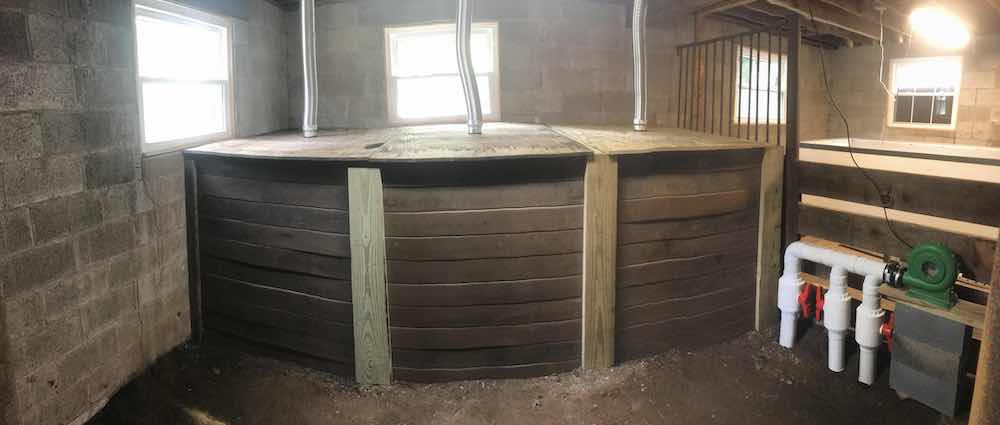
Step 1: Aerated Static Pile for Pre-Composting
Faced with colder winters, nearby neighbors, and some space limitations, I opted to create a 3-bin aerated static pile (ASP) composter in an empty horse stall in my barn. Read more about aerated static pile composting here.
So here’s the basic flow of operations with my ASP and CFT.
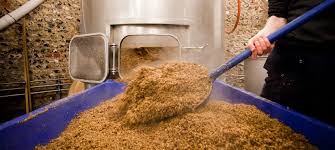
We retrieve roughly 1.5 cubic yards of spent brewer’s grains from the Conshohocken Brewery just a few miles away. We then begin filling the ASP bin with multiple batches of 35 gallons of brewer’s grains and two wheelbarrows full of wood chips. After we mix both ingredients in the ASP, we repeat that process until the ASP is full.
We then compost this mixture for approximately 4-6 weeks in our ASP, achieving temperatures of 150°F for most of that time.
This is enough time to near the end of the heating phase of composting.
Step 2: Feeding and Watering the CFT
Once or twice weekly, we feed the CFT roughly 2 inches of precomposted brewer’s grains. This amounts to 15 heaping 5-gallon buckets weighing around 350 lbs.
After the feeding, we typically break up some of the clumpier material by hand and remove any larger wood chips which might bind up the cutting bar when they reach the bottom of the CFT a couple months later.
We also end up raking out the surface to smooth out the high and low spots.
Our feedstock can have some varying moisture levels, so we will normally do a post-feeding watering for roughly 10 minutes using a garden hose and wand on a mist setting for a flow rate of 1.3 gallons per minute.
Step 3 : Heating and Insulating (Winter Only)
Our CFT is in an unheated barn built into the side of a hill which gives us a certain amount of geothermal heat from the ground. We also enjoy some heat produced by the ASPs that are sitting just a few feet away.
Additionally, we get a nice temperature bump for 1-2 days after we food our still-warm precompost mix which also helps to boost the heat-producing microbial activity in our vermicompost.
But in the dead of winter, we need some additional help if we want to keep the vermicompost above 55°F.
What seems to be working really well for us right now is a large seed starting mat attached to a thermostat. This delivers a nice, even heat to the surface underneath the mat without severely drying out the vermicompost.
And because we cover our CFT with rigid foam insulation, we can trap that heat, helping it to warm the ends and edges of the CFT where we don’t have coverage from the mats.
While I use the 20-in x 20-in mat in my Urban Worm Bag, the larger 48-in x 27-in mat from Vivosun is best for the CFT. In the image you see here, we are using two of them for a 16-ft CFT.
Do All Commercial Worm Farms Use CFTs?
No.
Some climates allow for the use of windrows for vermicomposting. Windrows, which are used for both composting and vermicomposting, are essentially long piles of material lying directly on the ground.
The Worm Farm in Durham, CA is one of the largest vermicomposting operations in the country and they use windrows. Arizona Worm Farm in Phoenix uses a “wedge” approach for their vermicompost production.
But Worm Power, a large indoor vermicomposting company in upstate NY uses a series of CFTs. The local climate is unfriendly to outdoor windrows and Worm Power also has very tightly-controlled process that require CFTs to main a consistent habitat which would be much harder in an outdoor windrow.
Step 4: Harvesting!
We harvest roughly once per week, getting about 75-100 gallons of material out of the bottom.
If you’re unfamiliar with how commercial CFTs actually get harvested, it will help to describe how the Michigan SoilWorks cutting bar is pulled over the metal mesh using the DC motor.
Let’s start from the cutting bar and explain it from there.
At one end of the cutting bar, a heavy-duty galvanized cable with a protective plastic sheathing is attached with cable clamps. This cable pokes through the aperture on the end panel of the CFT and wraps around a series of pullies which are directly attached to a single 100V DC motor.
The cable then continues under the CFT to another pulley which is pulled tight by a tensioner bolt. After wrapping around this pulley, the cable goes through the aperture in the other end panel and attaches to the other end of the cutting bar with yet another set of cable clamps.
Short Video of a Michigan SoilWorks CFT Cutting Bar
Unlike other CFTs which use winches at either end to pull the cutting bar, the Michigan SoilWorks CFT uses a single reversible motor protected by limit switches, that, when activated by contact with the cable connectors, interrupt the power to the motor.
A single harvest assumes a “round trip” of the cutting bar, to one end and back.
As mentioned above, we had some growing pains with our first couple harvests and these issues had everything to do with compaction.
But we got these issues sorted out thanks to Dan’s guidance and our own persistence.
To summarize the harvest, our situation in particular presented a challenge. Our precomposted material was a little wet, so we experienced more compaction than desired.
So the motor strained mightily under the resistance, but ultimately found its “groove” and we performed 2 weeks’ worth of harvests in a day’s time, relieving the CFT of the compacted compost, making future harvests much easier.
Despite the slow start, we are cooking with gas now and happily producing roughly 350 lbs of finished vermicompost per week.
Step 5: Removing and Screening the Castings
Our harvests don’t just drop to the concrete floor below.
Because our CFT is in a relatively cramped space and we don’t have the budget – or the need, frankly – for an expensive conveyor system, we crafted two shallow rolling platforms to insert underneath the CFT.
These platforms are made out of a single sheet of plywood (ripped down an inch or so to 47 inches wide) with open ends and side walls made from 2×4 lumber.
The platforms themselves sit on six 360-degree heavy duty casters which allow for omni-directional movement.
After our harvests, we pull the platforms out from underneath the CFT and, if necessary, toss them with a pitchfork to break up any larger clumps.
If we feel the vermicompost is a little too moist to screen, we then run a floor fan over the castings for a couple days to dry them out which ultimately helps us to screen them more effectively.
You have a couple options when it comes to screening your worm castings to remove coarser material or worms if you have them in your harvested vermicompost.
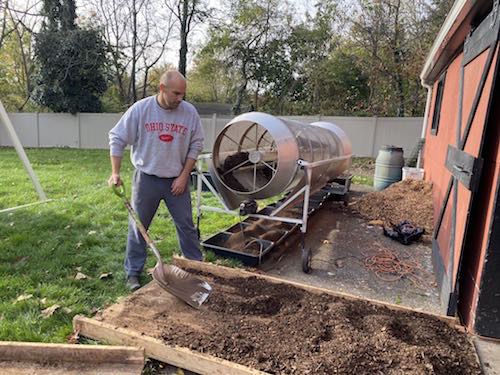
Budget permitting, a trommel harvester like the kind produced by JetSpeed is your best bet. But it’s an expensive machine if purchased new.
I was lucky enough to find a used one from a retiring worm farmer in North Carolina for a fraction of a new trommel.
It has been a wonderful purchase for us, allowing us to screen our harvests very quickly.
Note: 1/4-in mesh will allow some worms and cocoons to fall through into the screened material. Go with 1/8th-in mesh if this is a concern. But expect much less screened product to make it through.
 Lessons Learned for Making CFT Vermicomposting Work for You
- Beware that overwatering a CFT may not become evident for several weeks as the water will take quite a while to leach towards the bottom. Once a problem is detected, it will take several weeks to be corrected as the wetter vermicompost will need to be harvested.
- You should expect at least 4 months before your first harvest of sellable material, but there may be a several month period beyond that where you are adjusting moisture and refining your processes. You should conservatively expect at least a 6-month period before selling castings.
- Beware of large wood chips. These will not readily drop through the metal mesh bottom and may get hung up above the mesh. This causes compaction and havesting difficulty as the cutting bar will essentially push the wood chips around rather than cut through vermicompost.
- The thermal mass of a full CFT is an excellent buffer against extreme temperatures, allowing a CFT to tolerate short periods of extreme temperatures without lasting harm to the worms or the vermicompost.
- Wet, compacted areas of vermicompost will cause the pulling of the cutting bar to become much more difficult.
- Adding a small amount of dry coco coir to wet harvested castings will sop up excess moisture very readily and will make screening much easier.
- Expect lots of rocks if you are using horse manure as a feedstock.
- For the Michigan SoilWorks CFT in colder climates, consider filling the recessed areas between the steel structural members with rigid R49 insulation. The insulation will be flush with the outside of the CFT frame.Don’t judge moisture in the CFT by the surface of the vermicompost. Scrape just below the surface to get a better idea of moisture levels.
- Our rolling platform works incredibly well. Use a 4×8 sheet of plywood (you’ll need to reduce the width to 47 inches) for the platform, 2×4 lumber for the walls, and heavy duty omni-directional casters at the bottom.
- A Quickie Jobsite Gargantuan dustpan is an inexpensive tool for quickly scooping up vermicompost from the rolling platform. An aluminum scoop shovel also works well.
 Data Matters! What Information We Record
I admit that I would not normally have the discipline to collect this data, but my teammate Mark is very fastidious about recording what we think are the most important data points in our mini-operation.
See below for a list of the qualitative and quantitative information we record
- Record of each time we start a new aerated static pile bin (ASP)
- Daily temperatures inside our ASPs
- Daily indoor and outdoor temperature and humidity
- Daily temperatures taken inside our CFT, measured at each end
- Quantity of each feeding with observations on the characteristics of the precomposted material
- Volume and estimated weight of raw material harvested from the CFT
- Volume and weight of screened material from each harvest

Summary: Is CFT Vermicomposting Right for You?
Continuous flow vermicomposting systems are labor-saving worm bins….in theory.
In practice, you can spend as much time harvesting them as you do a regular worm bin or a windrow if you don’t have the moisture right.
If you let the vermicompost get too wet, the compaction can be incredible, and any commercial motor will have a difficult time pulling through the adobe-like compost.
But once you get the moisture under control – and keep it that way – the efficiency realized with a CFT can far outpace what you’ll find with a batch-style worm bin.
Again though, the initial price tag can be prohibitive.
If you’re interested in the Michigan SoilWorks CFT, you can purchase it through Urban Worm Company!
For those of you who can handle a DIY project, you may be excited to know that we offer the CAD plans and cutting bar as well!
Want to Scale Up Your Composting Operation?
If you’re interested in starting a mid-scale or higher vermicomposting operation, I want to hear from you! I partner with composting expert Francisco Niembro to design and install scaled-up composting and vermicompomposting operations in the United States.
Our design service includes analysis of your space, budget, required input, and desired output. Your design will include equipment recommendations, renderings of your project, and a detailed financial analysis.
(Serious inquiries only please!)
Shoot me an e-mail if you want to learn more.
Hi Steve,
I’ve definitely been noticing the moisture problem in the lower levels both my urban worm bag and worm factory style tray system. I was thinking the worms weren’t coming to the top due to lack of food or the top was to dry… so I started adding more water.
Do you have any tips to keep the moisture level appropriate? I usually try to get the moisture right of my compost before feeding the worms, however the top does dry out even when covered due to the dryness in Colorado. Perhaps I just need to be more careful with the watering?
If the bottom is too wet do I need to just harvest it and sort the worms? Last urban worm bag Harvest I probably had to pick out ~300-400 worms so they are there… just not where I want them!
So, I am curious where you place a transplant heat pad IN an Urban Worm Bag. Fantastic information and you are a marvel of American entrepreneur ship. Salute!!
OKAY! Just to save you the aggravation of having to repeat yourself, I just came across the article on winter tactics for keeping worms warm. Sometimes the obvious is just too obvious. Happy New Year and see ya in ’21!
Ha! You got it Denise! 🙂
Cheers,
Steve
Great article, Steve. Sorry it took so long for me to get around to reading it.
Cheers! <
To help reduce the moisture at the bottom of a CFT, have you tried or do you use a MORE BREATHABLE
material then the upper portion of the . Gravity will always bring excess moisture down, but the more it can breath, the more it will reduce it.
Your thoughts.
Milo
Hello from South Africa!
I’m a commercial farmer.
I’m busy building a 32′ cpf to the same dimensions as yours.
Would you mind to share information regarding the size of the motor for the cutting blade.
Thanks so much!
I have thought about getting something like this to raise my worms. I raise some now for personal use for fishing but would like to build something bigger and have enough to give or sell worms to all my friends that want my worms. This is interesting. I think I will start with the bags but might build a big box some day. Thanks for the information.
I’m super stoked about this system. Anyone has any experience in making fungal dominated compost with this system?
Hey P.
Making fungal vermicompost is going to be dictated more by the type of material you’re vermicomposting and how it was composted (or not composted) prior to feeding to the worms. As you probably know, pre-composted material that recently went through the thermophilic composting phase will not feature much if any fungi. One option is using a Johnson-Su method (promotes a fungal compost) for composting your materiaL and then using a CFT for your vermicomposting.
Cheers,
Steve
I have started looking into using a CFT to compost some of my company’s yard waste. Was reading about some moisture issues. Is there a recommended moisture level that can be tracked?
Hi Ryan,
You want to target between 60 and 70% moisture in your CFT!
Cheers,
Steve