Every now and then, I think it’s helpful to reevaluate prior assumptions about the basics of vermicomposting. There’s no one way to do worm composting correctly for all situations, and if there was, nobody has written a book on how to do it just yet.
One of these assumptions is about the correct moisture level within our worm bins. And I am getting the feeling that the conventional wisdom is leading us to keep things a little too wet.
But even if things are going OK for you, every now and then it’s probably helpful to ask:
- How wet should my worm bin be?
- Does vermicompost really need to have anywhere close to an 80% water content?
- I’m making worm castings, but are those castings a little muddy?
This article is part of a “Vermicomposting 101” series of posts aimed at helping the beginning vermicomposter. The read other “VC101” articles on how to start a worm bin, how to choose worm food, how to maintain moisture, and the differences between composting and vermicomposting, please visit the Vermicomposting 101 section of this site!“
Why Are Most Worm Bins Too Wet?
While this article won’t give you a hard number that you’re looking for in terms of moisture content, I want to bring up the probability that most worm bins are simply too wet.
There are a few reasons for this, in my opinion.
- We know that worms breathe through their skin and that a certain level of moisture is required to transfer oxygen through the skin. One vote for keeping the bin wet!
- Most home vermicomposters are feeding food waste to their worms, often without adding fresh bedding. As this food waste tends to be fruit and vegetables, it means a food waste with water content much greater than 80%, even 90% in some cases.
 The presence of a tap to release leachate on stackable worm farms like the Worm Factory 360 has given some people the impression that leachate is a desirable byproduct of vermicomposting, when in fact, it is a sign that a worm bin is too wet. And yes, I know some people use leachate on their plants. But the presence of leachate indicates that a worm bin either has 1) excess total moisture, or 2) moisture that has been added too quickly, not allowing the bedding and substrate in the worm bin sufficient time to absorb the influx of water.
The Urban Worm Bag And Excess Moisture
One interesting byproduct of designing and marketing the Urban Worm Bag is the ways I have learned that some people do worm composting, revealing some lessons for me about some of the limitations of my own product. It was a failure of imagination for me not to consider that people would place them in their yards, on driveways or porches, which would place stress on the frame.
But it was also a bit of a wakeup call to hear that people wondered how to catch the leachate (which most of them referenced incorrectly as “worm tea”) that they were intentionally trying to create with the Urban Worm Bag.
Now, in my testing, I did intentionally overwater one of my Bags to the point of watching water stream out of the bottom zipper, which eventually gunked it up to the point that I realized that Version 2 (which is released, hooray!) needed to accommodate a much greater range of wetness.
In short, the excess moisture was making it very difficult and even impossible for some customers to open their zippers after a few months. Hence, the biggest upgrade from Version 1 to Version 2 is the addition of an interior fabric enclosure to better protect the bottom zipper from excess moisture and the grit associated with the vermicompost.
But it was also the positive feedback from customers who were having great experiences with Version 1 of the Urban Worm Bag, most of whom had not observed any leachate draining from the bottom. One of these earliest UWB users, my “Dirt Girlfriend” Heather Rinaldi of the Texas Worm Ranch sent me a video of both an easy harvest, but also a video of a very biologically-active vermicompost harvested from the Urban Worm Bag.
This made me very happy. And it made me wonder what would happen if I ran a much drier bin?
Key Insight: The Pros Have Relatively Dry Vermicomposts
It’s not just the drier sort of worm castings she harvests easily from the Urban Worm Bag that have me thinking this way. (Believe me, I’m aware of the temptation to suggest vermicomposting methods to suit the Urban Worm Bag’s own tendencies. And I don’t want to do that!)
It’s that her vermicompost in her commercial operation is drier than the vermicompost I’ve created myself and much drier than most of the worm bins I’ve seen on YouTube and other social media posts.
Her feedstock is mostly partially-precomposted waste from local landscaping and tree services with a mulch-y consistency, supplemented with juice bar waste. But this relatively dry vermicomposting process still results in worm castings that demonstrate high levels of biological activity that she constantly observes under a microscope.
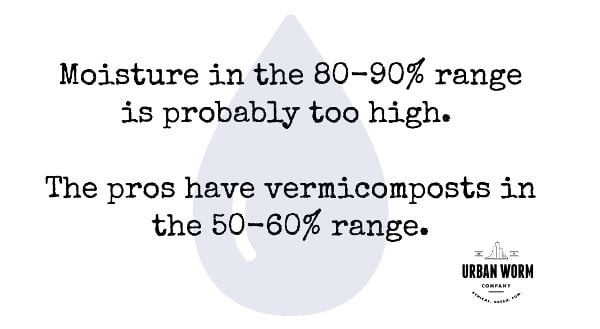
In fact, Heather says that “once you get above approximately 50% moisture content, you start seeing anaerobic indicator species (like ciliates) under the microscope. These conditions are more likely to host anaerobic bacteria that could be pathogens to either plants or people.”
Ideally, you maintain appropriate moisture throughout the entire vermicomposting process, or bring moisture levels to that “Goldilocks level” as soon as possible through good maintenance (like adding dry bedding).
Heather adds that “you don’t have to have a moisture meter or a microscope. Just learn the ‘chocolate muffin test. If you can grab your vermicompost (or garden soil, for that matter), and make a ball that holds together, yet will crumble away with your thumb, that is spot on. If your vermicompost sifts through your hand like sand, it is way too dry. If your vermicompost is so sticky that it won’t easily crumble away–or you can make a ball that won’t even break when it hits concrete– it is too wet. Healthy soil, compost, and vermicompost should all have that perfect chocolate muffin texture.”

Another example is my friend Gavin Newton who runs WormCycle, a small commercial operation near Detroit, Michigan. Gavin’s process involves feeding composted horse manure into his Michigan SoilWorks CFTs. After his harvests, he dries his castings under a fan for 2-3 days, to achieve what he estimates is a 30-40% moisture content. This allows it to run more easily through a Brockwood Worm Shifter, a nifty elevated table on wheels that shakes vermicompost down a fine mesh decline. The result for WormCycle is a very fine, somewhat dry worm cast.
But Gavin is interested in the biology of his vermicompost as well. And in a blind test of WormCycle’s worm castings plus 3 other well-known brands, WormCycle’s castings demonstrated far higher amounts of microbe colonization than the other brands.
I also recently spoke with Cristy Christie of Black Diamond Vermicompost about her vermicompost, both pre- and post-harvest. She has a fairly sophisticated watering system at her Paso Robles, CA location but is extremely careful not to let her vermicompost get too wet.
Cristy uses continuous flow through systems, and at first thought you might think that a wetness problem would just take care of itself as the leachate would work its way through the vermicompost, through the mesh bottom, and down to the floor below. But she says that a wet CFT means that the worms will “follow the water,” resulting in not only muddy castings at harvest time, but many more worms in the harvest than she desires.
Ultimately, Cristy wants to get her castings down to a 35% water content before bagging.
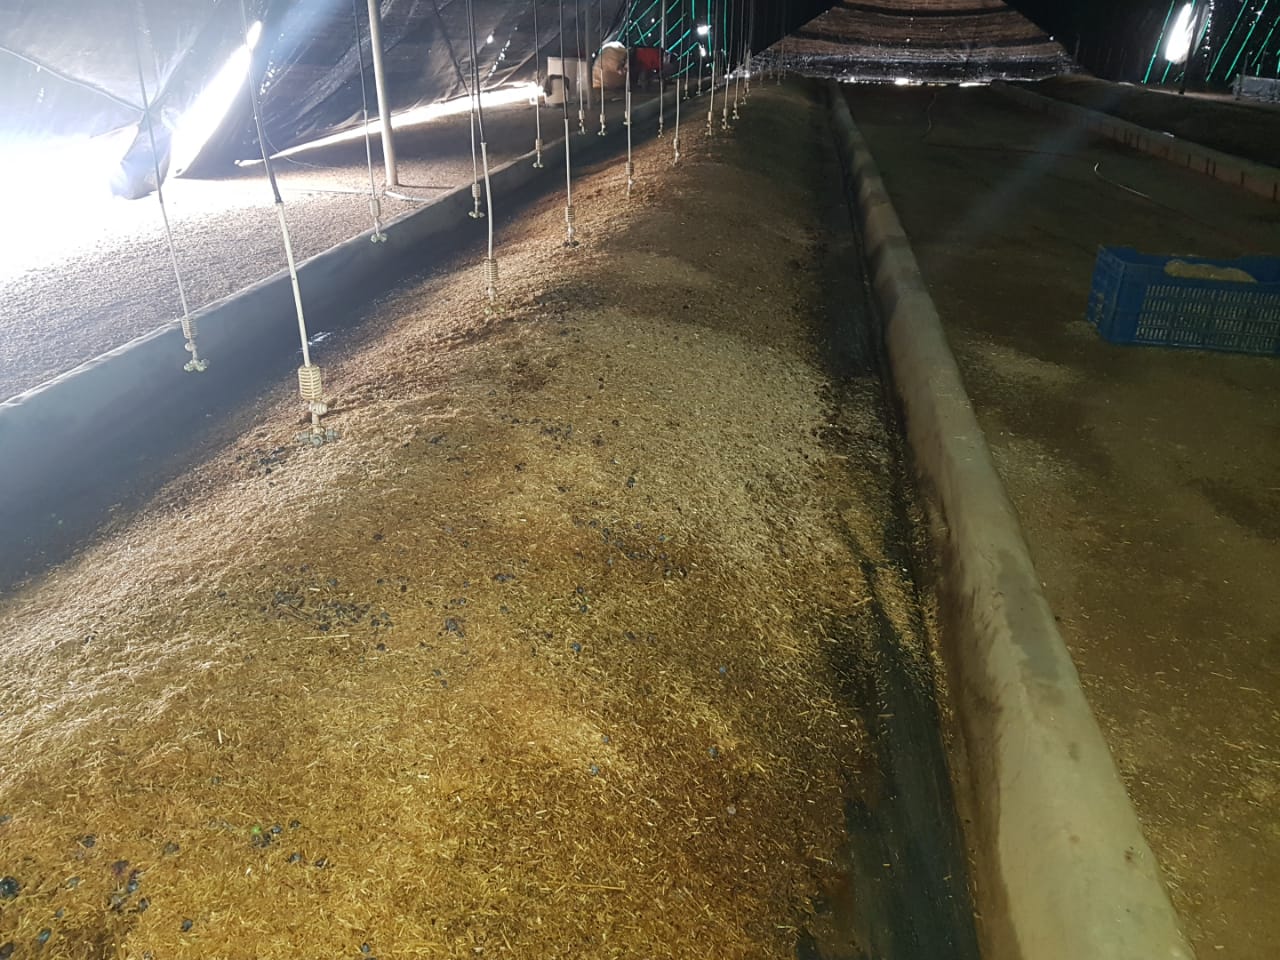
My friend Francisco Niembro of Aldea Verde Lombricultura installs absolutely enormous vermicomposting operations for organic waste producers in Mexico as well as operating two large facilities under the Aldea Verde name. Using a simple windrow system for vermicompost, Francisco estimates his beds are roughly 40-60% water content.
Francisco also stresses that worm compost must be applied with a mist or a fine spray rather than poured water. Francisco sent along the video of the automatic misting system at one of his locations. Notice how finely the water is applied. There’s really not much being applied, but the added water is applied very evenly.
While most of us have no need for a watering system like this it should at least drive home the point that our vermicomposts do not need to be saturated in order to be moist enough.
So in the end, Texas Worm Ranch, Worm Cycle, Black Diamond, and Aldea Verde are all very aware of keeping the operations within a reasonable moisture range, which I guarantee is far less than 80%…..and most likely 60% on the high end.
And they are all sticklers for maintaining the biology in their vermicompost and/or worm castings.
Lessening the Moisture in Your Worm Bin: Wanna Give It a Shot?
If things are going well for you, don’t worry about trying anything new. But if you’re curious if your worm bin could withstand a little less moisture, it may be worth giving this a shot.
To reduce moisture in your bin, try some or all of the following:
- add dry bedding every time you feed water-laden foods like watermelon, honeydew, canteloupe, etc.
- add dry bedding every other time you feed with less water-laden waste like broccoli or cauliflower waste.
- if your worm bin needs more moisture, especially for those of you in arid climates, add water to your bins by spraying or spritzing, not pouring water into your bin.
- if you have an enclosed bin and are confident your worms will not try to escape, leave your bin uncovered for a day or two.
Observing Results of Your Drier Worm Bin
So one thing I have neglected to mention thus far is how to accurately – and cheaply! – measure moisture in your worm bin. You could go with a cheap moisture testing probe, but I’ll be honest with you….they are reliably unreliable. Maybe the new ones are better, but I think at the most simple level what you ought to try is to just run your bin a bit drier than you have so far.
And this will be a matter of feel. A common technique is to grab a representative sample of your vermicompost and squeeze it it your hands. If you can squeeze out just a few drops of water, then the conventional wisdom says that’s just about right. But whether through a combination of more dry bedding, less watering, or even less feeding, see if you can make it even drier than this.
Keep in mind that moisture will not be uniform throughout every layer of your bin
But then what?
Simply observe the worm bin and note the following:
- Are the worms any smaller?
- Are they swarming food less noticeably?
- Are they trying to escape?
- Note: My experience tells me that worms will not typically roam away from a dry bin as even a relatively dry bin will be a swamp compared to what’s outside of it.
- Are you seeing less evidence of reproduction, aka cocoons and babies?
If the answer to all of these questions is “no,” then you haven’t hit bottom yet. Not that you need to continue any experiment beyond where you are comfortable, or even “hit bottom,” but if you suspect that your bin that might be too wet, then the tips above may help.
What Has Your Experience Been with Worm Bin Wetness?
How has it been going for you? What have you experienced?
I’d love to hear what your experience is with this issue and what you did about it. I’m also all ears for any positive or negative feedback you have about this article. Extra points given for thoughtful responses!