Welcome to the Urban Worm Guide to Biochar!
This guide will give you an A-Z overview of biochar, it’s properties, how it’s made, why biochar is so good for soil, and how you can make it at home!
What is Biochar?
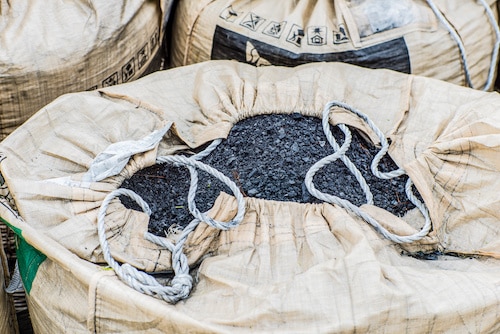
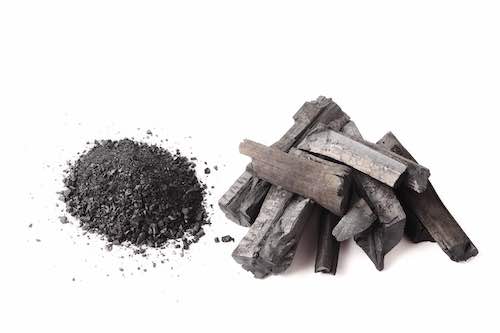
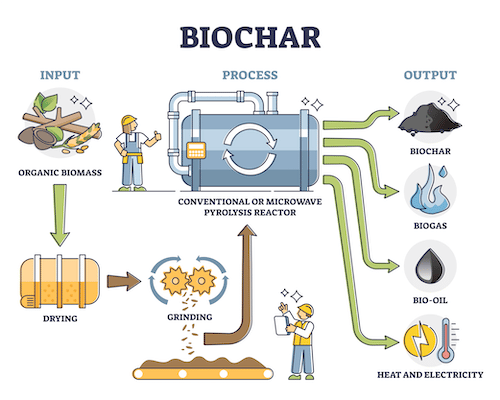
Biochar is a soil amendment made from organic matter that has been partially-combusted in an oxygen-starved, high-temperature environment.
This process, called pyrolysis, can turn wood, manure, and plant-based agricultural residue into biochar using customized kilns that either remove oxygen or restrict oxygen’s entry into the combustion chamber in the first place.
The remaining char is normally then crushed or ground to produce a fine particle which is then charged with nutrients or inoculated with microbes using compost or a liquid application.
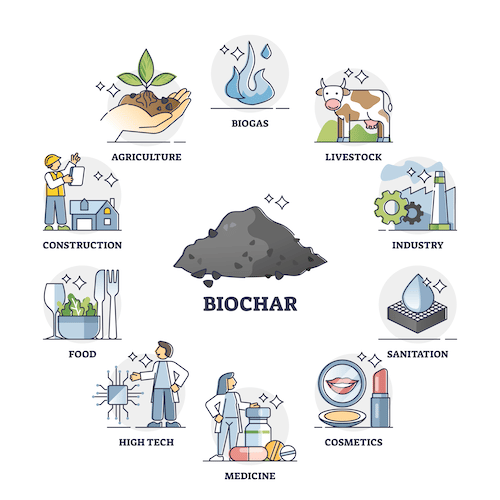
Biochar and its cousins – charcoal and activated carbon – have a growing number of use cases in medicine, filtration, and cosmetics.
But what we’re most excited about is its potential as both a carbon-sequestering material and an increasingly-popular soil amendment.
Why Is Biochar a Popular Soil Amendment?
Microbes Love the Immense Surface Area
Biochar has a simply ridiculous amount of surface area available for microbes.
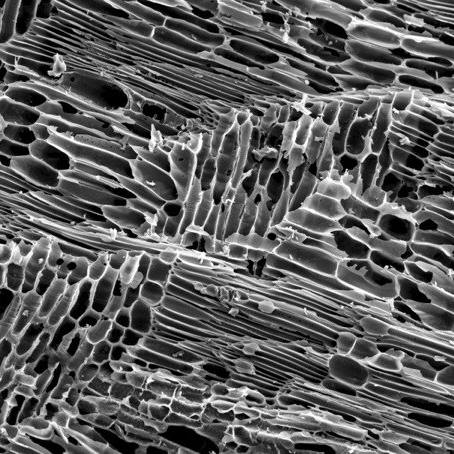
As organic matter is burnt away, a tightly-bound, porous, honeycomb-like structure remains. The immense amount of nooks and crannies in biochar serve as a habitat for microbes to thrive. Jon Nillson of North Carolina-based CharGrow says that a single gram of high-quality biochar contains the same surface area as two full-sized basketball courts.
The boom in organic gardening methods places huge emphasis on the importance of microorganisms like bacterial, protozoa, fungi, and nematodes. And biochar can act like a protective habitat for an incredibly dense population of these tiny nutrient-cycling animals, leading Nillson to dub biochar, “the Manhattan of Microbes.”
Biochar’s proponents also say it can improve water retention, reduce fertilizer use, and even clean up polluted soil.
High Cation Exchange Capacity: A Tale of Live-in Lovers
Biochar has a high CEC, or cation exchange capacity.
In the simplest terms I can communicate, CEC measures the soil’s propensity to hold on to nutrients, thanks to a negative charge in soils with high cation exchange capacity. Positively-charged ions like potassium, calcium, and ammonium are highly attracted to biochar’s negatively-charged surface, but will not bind chemically with the biochar itself.
This phenomenon is called adsorption and the best way to bring it into layman’s terms is that soil nutrients and biochar are “live-in lovers.” Unlike absorption where a particle is drawn into a material, with adsorption, that particle has a literal superficial relationship to another material.
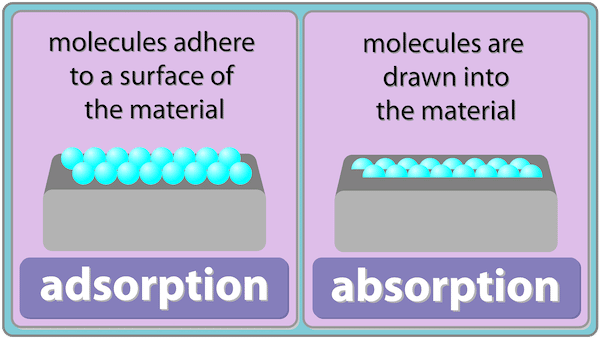
They are highly-attracted to one another but have not entered into holy matrimony.
So when it’s time for nutrient uptake by a really hot plant in the neighborhood, there is a method that allows that nutrient to leave its biochar home and be subsumed by the plant’s roots.
How does this hottie plant get the nutrients to leave its former biochar lover? An absolutely killer Medium article by Austin Liu spells this out as clearly as I’ve ever seen.
I’ll paraphrase below.
When the plant is hungry for nutrients, it eats up some of its own carbohydrates and releases carbon dioxide into the soil. When this CO2 comes into contact with water, it becomes carbonic acid and then releases hydrogen cations into the soil.
These hydrogen cations are positively charged, just like the potassium, calcium, and ammonium ions.
Opposites attract. So once the hydrogen cation finds a negatively-charged surface – whether that’s on biochar, clay, organic matter, or other negatively-charged material – it can take the place of these positively-charged nutrients.
These jilted lover nutrients are now swingin’ singles again on the prowl and are free for uptake by the plant’s roots.

Thus, the biochar just exchanged cations, releasing them into the wild in exchange for another, like Leonardo DiCaprio does women once they reach the ripe old age of 25.
The biochar’s negative charge, plus its Texas-sized surface area, makes it an extremely dense space where the promiscuous soil particles can engage in semi-committed relationships until something better comes along.
In soil with low CEC, these water-soluble nutrients – often present in massive quantities due to synthetic fertilizer application – are left without a dance partner to hold on to.
And these nutrients are easily be flushed out of the soil into waterways where they can create toxic algal blooms. (Looking at you, Lake Erie!)
The Downsides of Using Raw Biochar in Soil
At this point, adding biochar to soil seems like magic.
But leaving aside the issue of quality biochar – which we’ll get to later – adding a microbe- and nutrient-free uncharged biochar will not likely produce positive effects. In fact, it is likely to have an initially negative effect on your plants for 1-2 growing seasons.
Why?
Remember that fresh biochar is only a structure; a habitat for microbes and nutrients. The “factory preset” biochar is microbe- and nutrient-free, yet is highly attractive to both. This biochar has not yet been charged with nutrients or inoculated with microbes..
So when uncharged biochar is added to soil, it vacuums up the swingin’ single nutrients and microorganisms, for a time at least.
In much the same way that a heat sink will absorb heat and then slowly release it back into the cooling environment, biochar is a microbe and nutrient sponge. It “hoovers” up the goodies in the soil – which can produce a negative effect on plant growth – but will then begin feeding them back into the soil.
In order for biochar to produce positive results for your soil from Day 1, then you need to charge it with nutrients and inoculate it with microbes.
Charging Vs Inoculating Biochar
We discussed biochar’s amazing capacity to attract and store both nutrients and microorganisms. We also discussed how raw biochar would suck this stuff up from your soil, making it less available to plants, thus hurting your growing efforts, as least initially.
So to make sure you don’t see negative effects from biochar, you want to introduce a char to your soil that already includes these nutrients and microorganisms. You do this through charging and inoculation.
Charging is the process of introducing nutrients to the char. Remember, biochar has a negative charge, which will attract positively-charged nutrient cations. Fortunately, the charging process can take as little as a few minutes by steeping your biochar in a nutrient-rich organic fertilizer.

Inoculation is the process of colonizing your “microbe condominium” with microorganisms. You can inoculate biochar by including it in your compost or vermicompost. But this would give you a biochar-infused vermicompost or compost. If what you’re looking for is a fully-inoculated biochar, then drenching it or steeping it in an actively-aerated worm tea or compost tea will do the trick!
Note: The benefits of “co-composting” with biochar do not just provide benefits to the char. The composting process can also be aided by biochar’s prodigious microbe-storing capacity, helping those heat-loving, heat-producing microbes to flourish.
Nillson says that adding biochar helps the “hangtime” of compost by maintaining elevated temperatures for a longer period of time.
Terra Preta, the Earliest Use of Biochar
Although it seems like organic gardeners are just now discovering biochar, scientists have uncovered evidence that it was used – knowingly or unknowingly – thousands of years ago by Amazonian communities to boost what is otherwise very infertile soil.
Excavations of this terra preta – Portuguese for “black earth” – show clear evidence of charcoal, bone, shards of pottery and animal manures. This soil organic carbon has persisted in the soil for up to an estimated 2500 years.
This soil is far more fertile – and with 3 times the organic matter – of the surrounding “common soil,” also called terra comum.
The concentration of organic char is greatest in the soil just underneath these communities. So it’s possible that the addition of this material to the soil was simply incidental to daily life in the Amazon. Other recent excavations show a higher concentration of carbon on areas of higher land which indicates that this may have resulted from volcanic eruptions.
But according to this article from Cornell University, it is widely accepted that the soils were a product of intentional “indigenous soil management.”
Why Is Biochar Good for the Environment?
Elongation of the Carbon Cycle
Our growing body of knowledge around the carbon cycle and climate science has proponents equally optimistic about its use for carbon sequestration.
To understand the concept of carbon sequestration, you first have to understand the carbon cycle.
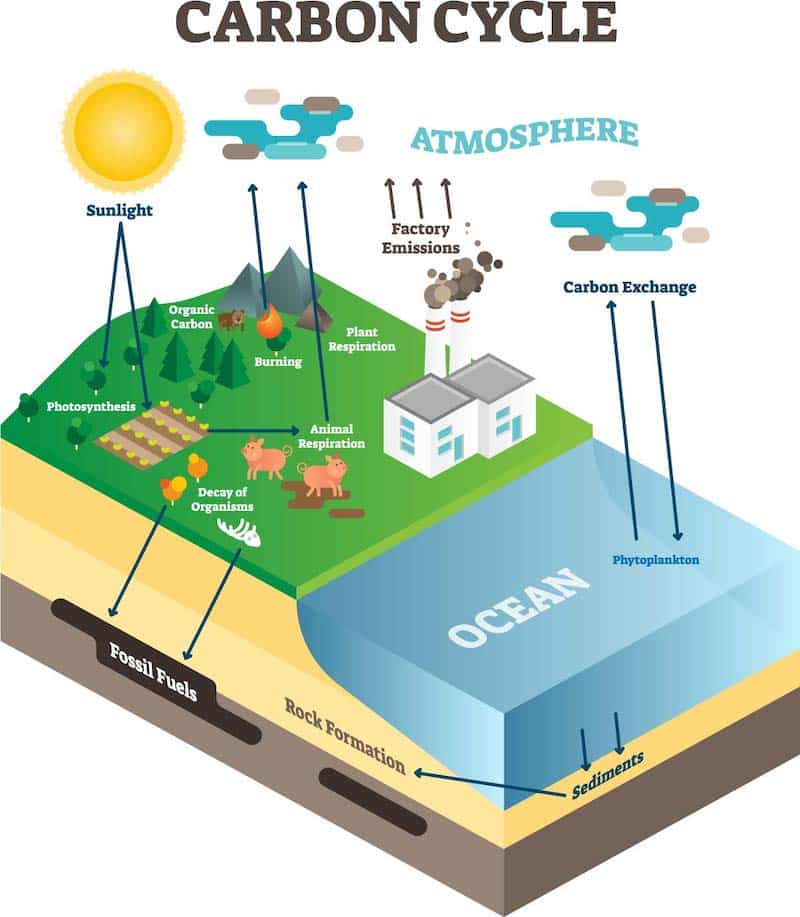
Through a never-ending sequence of events, carbon gets cycled through our soil, the geology below our soil, the atmosphere, and the lakes and oceans that cover 3/4 of our planet in water.
A fast carbon cycle might take tens to hundreds of years.
For example, plants remove atmospheric carbon in the form of CO2 and store carbon until the plant’s expiration. The stored carbon is then released into the atmosphere as CO2. This happens relatively quickly.
Longer carbon cycles are measured in thousands or millions of years.
An example would be ocean-based carbon being subducted into the earth’s crust or extracted by marine life like coral, oysters, and clams to form into protective calcium carbonate shells.
Fossils and fossil fuels are well-known products of the long carbon cycle.
What excites biochar’s proponents is its ability to lengthen an otherwise fast carbon cycle. Instead of a decaying tree remaining in the short carbon cycle, converting it to biochar will enter that carbon into a long carbon cycle.
If plowed into the earth, that carbon would have a mean residence time of potentially hundreds of years or more.
The science on the certainty of mean residence time in our soils is debated among scholars, but even on the low end, biochar appears to draw out an otherwise short carbon cycle.
In contrast, the use of fossil fuels takes a long carbon cycle and shortens it by taking geological carbon and turning it into atmospheric carbon.
Lengthening the carbon cycle is a benefit by itself, regardless of biochar’s soil-amending capacities.
Soil Remediation: Maybe?
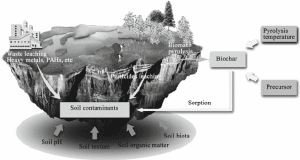
Nutrients aren’t the only positively-charged cations in the soil.
Pollutants like arsenic, cadmium, chromium, copper, nickel, lead and mercury can exist in soils as cations as well.
And biochar’s negative charge gives it a propensity to attract and immobilize these pollutants, thus exciting those who want to see it employed to remediate polluted soil through the same adsorptive process described above.
The jury is still out on whether biochar is a viable solution to heavy metal pollution and there are no conclusive long-term studies to make a case one way or another.
It’s also worth pointing out that biochar cannot remove pollutants or expel them from the soil.
To use the same slightly off-color analogy from above, pollutants can enter into semi-committed relationships with biochar without changing the chemistry of the pollutants themselves.
If your annoying uncle is a pollutant, and his new girlfriend is biochar, then he’s still your annoying uncle. It’s just that he may thankfully choose to spend Thanksgiving somewhere other than your house.
What’s Biochar Made From?
Most biochars are made from wood products, however it can be produced from grasses, manures, and other agricultural residues.
But as I mentioned above, biochar is not a commodity where one product will be identical or even similar to another. The difference in feedstocks and production methods is responsible for differences in carbon structure, pH, cation exchange capacity, and more.
And a grower’s choice of biochar should depend upon his or her existing soil’s needs. Addressing the needs of particular soils is beyond the scope of this article.
How Do You Make Biochar?
Just like worm bins, biochar kilns range from the ridiculously simple to the more complex. But I’d argue biochar production is a more multi-faceted process as advanced machines will capture the heat and gasses emitted during the burn.
So this article will focus more on 3 common home production techniques with only a passing mention for the more sophisticated machinery with enclosed combustion.
Method 1: Kon-Tiki or Cone Kiln
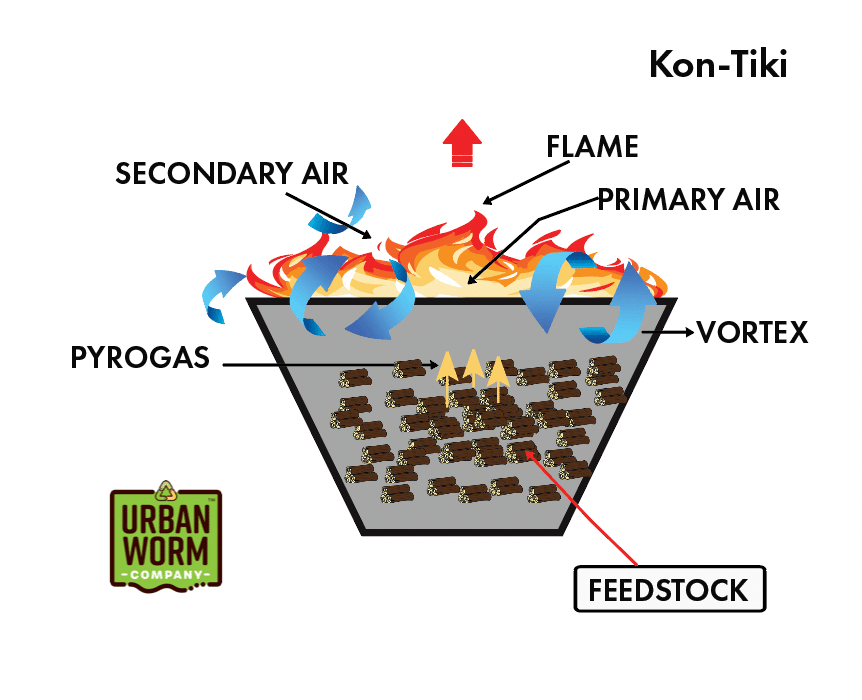
This open burn technique uses a simple cone-shaped steel kiln. A small fire is created either in the bottom or near the bottom of the kiln as some designs employ a steel grate to suspend the material above the bottom of the cone.
As white ash begins to form on the burning material, you will begin to add another layer of wood. Assuming you’ve fully covered the still-burning layer below, you will have begun starving the bottom of oxygen while still applying massive amounts of heat to it.
This heat expands the gasses in the wood where they eventually escape and are drawn up the angled sides of the cone. This produces a doughnut-shaped toroidal vortex where the gasses are pulled up the outer edges of the doughnut to mix with the oxygen being drawn down into the center of the fire.
So gasses travel up the outside of the doughnut to combust with the oxygen traveling towards the inside of the doughnut. This top-layer combustion applies even more heat to the bottom layers of wood which will emit even more gas which enters the vortex to create more heat and so on.
But the “flame curtain” covering the top of the Kon Tiki kiln will prevent oxygen from passing down to the bottom layer where your biochar production is happening.
And this is the essence of pyrolysis; you are burning the gasses, but not the carbon!
Method 2: Top-Lift Updraft or TLUD
The Top-lit Updraft kiln or “TLUD” is another popular biochar production device, although slightly more sophisticated than the cone-shaped Kon-Tiki kilns.
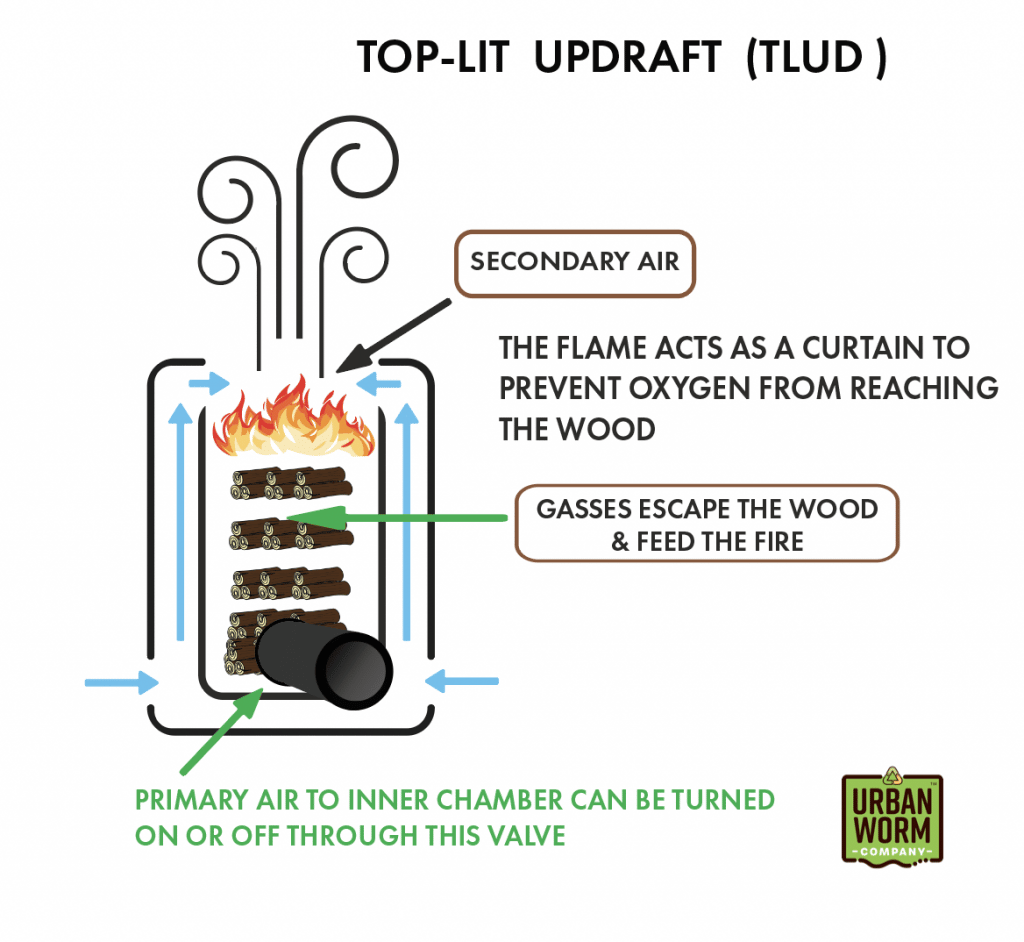
Lots of stoves employ a TLUD (pronounced TEE LUD) concept and it is beyond the scope of this article – and my own knowledge – to describe them all.
The TLUD I’ll describe is a design from Bob Wells of New England Biochar and Living Web Farms. It is a double-walled contraption like insulated Yeti-style mug, with an internal chamber where combustion takes place.
This internal chamber is vented by a damper valve that can be opened in order to draw air into the TLUD to facilitate the initial combustion. The damper can be fully or partially closed in order to modulate airflow and ensure a clean, smoke-free burn.
The exterior wall of the TLUD features holes at the bottom – which appear decorative but serve a crucial purpose – to allow air to enter and become heated. At this point, it will rise and exit through holes in the top of the inner chamber where it will feed the top-lit fire and help siphon the exhaust up through a removable chimney.
In Bob Wells’ design, this chimney can also be replaced with a grill attachment for cooking purposes.
The TLUD approach uses the same “flame curtain” employed in the Kon Tiki which prevents the free flow of oxygen to the internal chamber.
But it’s important to point out that a fire in a TLUD device does not make it a top-lit fire. Whether due to operator error or choice, a conventional bottom-lit fire is plenty possible in a TLUD. The operator needs to build the fire in such a way to ensure a consistent flame layer that covers the top of the internal chamber.
The bottom damper also needs to be modulated to restrict airflow into the bottom of the TLUD.
Method 3: Retort

Although this method may take a little more DIY work upfront, I consider the retort to be the simplest concept to explain. In a biochar retort, organic matter – normally wood – is placed into a steel drum or barrel. This is the material which will ultimately turn into biochar.
This barrel is then placed upside down inside a larger barrel to allow some venting but prevent exposure to oxygen-rich air. This larger barrel is then stuffed with flammable material which is typically wood.
The outer barrel is covered with a partial lid and a stovepipe. The lid will be vented to allow oxygen to enter the exterior chamber and a stovepipe will be added on top to create a stack or chimney effect to facilitate the exit of the rising hot air.
The inner chamber will be not be exposed directly to open flame and will likely be vented.
The flames in the outer barrel begin applying intense heat (650-1200°F) to the contents of the inner chamber. This causes flammable gasses to escape from the wood, then escape from the inner chamber where they will feed the fire in the outer chamber.
After a burn that may last 4 hours or more, the fire will be extinguished. The wood in the inner chamber will be reduced to a carbonaceous skeleton with a huge amount of negatively-charged nooks and crannies which will attract both microorganisms and positively-charged nutrients.
In contrast to the Kon Tiki or TLUD’s flame curtain, the organic matter to be pyrolyzed in a retort is physically separated from oxygen-rich air. There will only be enough venting to allow the escape of combustible gasses from the wood
This excellent video below describes how a retort can be made from a 30-gallon barrel, a 55-gallon barrel, and a stovepipe.
Method 4: Carbonizers, Gasifiers, & Sophisticated Machinery
Far beyond the home scale are extremely expensive biochar systems used on an industrial scale.
These machines can often prepare and grind the waste on the front end, but also capture gasses, oils, and heat on the backend in addition to the biochar.
Method Summary: What Does Good Biochar Look Like?
Biochar made using any method should have certain characteristics.
While expert scrutiny under a microscope will provide the best assurance of quality biochar, quality can be observed through normal eyesight, touch, sound, and even taste!
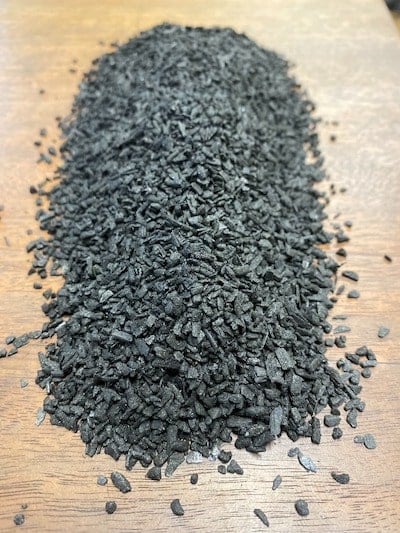
Quality biochar will be black throughout with no un-pyrolyzed brown material on the inside or white ash on the outside. The carbon skeleton will be very light and should leave little residue on your fingers when handled.
When dropped on to other pieces of biochar, it should make a “clinking” sound as though you might be dropping coins or pieces of glass.
And finally – this is for the truly committed – biochar can be tasted for quality.
Bob Wells of New England Biochar takes a literal bite out of each batch of char, expecting a taste-free experience which indicates the absences of resins and/or toxins in the material.
Biochar and Worms: A Match Made in Heaven?
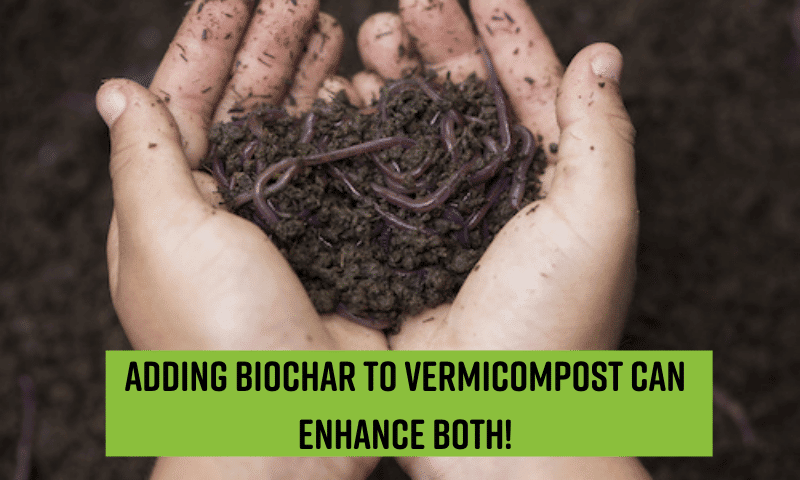
In short, yes! Adding char to vermicompost can both house microbes and can also be a source of grit for the worms. (Can you imagine what kind of biology that a speck of biochar can pick up as it travels through a worm’s gut?)
But it’s a bit more complicated than that.
Do you want biochar-infused worm castings?
Or do you want a biochar that has been charged with the microbes present in high-quality worm castings?
Making Biochar-Infused Worm Castings
To full realize the microbe and nutrient-storing capacity of biochar, it’s best to introduce it in the vermicomposting process as soon as possible. For the home vermicomposter, this means sprinkling a few grams of this black crystalline substance into your bin periodically. This early application ensures that you’ve given the biochar time to attract its inhabitants.
For the commercial vermicomposter, you’ll want to add biochar during the precomposting process. But keep in mind that while the the organic matter in your compost will reduce in volume, the biochar will not. So if your biochar-infused precomposting material reduces by 50%, then you have effectively doubled the density of char in your material.
Considering the relatively high cost of biochar, this is a good thing!
Charging Biochar with Worm Castings
If your goal is to produce a charged biochar from your worm castings, then I love the idea of using a worm tea or extract to introduce biology to the biochar.
I am not a worm tea or biochar expert, but adding biochar into the worm tea production process seems like an excellent way to charge the char while making tea.
You can simply add your loose biochar to the bottom of a 5-gallon bucket, fill the buckets almost all the way up with dechlorinated water, and suspend worm castings in the water inside a bag with a very tight mesh to allow water to come and go while trapping larger particles.
Add a food source like kelp meal to the water and agitate the water for 24-36 hours using an aquarium bubbler and bubble stone.
At the end of the process, you’ll be left with the worm castings in the bag, a potent compost tea, and a biochar that has been steeped in a blossoming microbe population.
Wrapping It Up: Final Thoughts on Biochar
Biochar has certainly caught my attention, both as a carbon sequestration tool and as a potentially game-changing soil amendment. Its attractiveness for nutrients and capacity to house microbes makes it an apparent manna from heaven for organic gardeners.
But I think it’s wise to step back and remove oneself from a quasi-religious fervor and understand that, like worm castings, biochar is not a singular commodity.
It’s a product whose quality and appropriateness for a given crop or soil depends on feedstock, production technique, effective inoculation and charging practices, and more.
Academic literature on biochar suggests anywhere from a negative effect on crop yields to a 2-fold increase. So while biochar could be what the soil doctor ordered, it’s not a given that it’s an unalloyed good either.
As a carbon sequestration method, improper technique or faulty equipment could result in fully-combusted organic matter, possibly shortening the carbon cycle and creating a negative environmental effect.
So let this article be a starting point for your research on biochar rather than a source document for your argument in favor of it.
What say you?
What have you heard in favor of – or against – biochar? Let me know in the comments below!
This by far the best and most comprehensive non-technical article I’ve read on biochar and it’s connection to composting and vermiculture. I’ve been buying biochar for a while and using it in the garden and compost, but I haven’t used it in my worm farm. More exciting experiments to come. By the way, I’ve produced biochar myself as a by-product of room heating using a slow-combustion stove/heater with the air intake nearly closed.
Oh David, thanks so much! I absolutely love this feedback! Let me know how it goes when used directly in the bin!
Thanks so much Nick! Please let me know how it goes!
Steve, that’s a great article, wonderfully written and very entertaining for your unique writing style.
Now, imagine that you replace biomass like Wood, manure, or other stuffs to be pyrolysed with chicken bones as the starting feedstock.
And voilà, BoneChar is made: Carbon and phosphate married together, the home for microbes and a rich source of médium to fast bioavailable essential nutrients
Bone char….I like it! Hadn’t thought of bones before…..
I bought a camping stove from Blue Sky Biochar that makes Biochar. (https://blueskybiochar.myshopify.com/collections/all/products/fabstove-tlud-clean-cook-stove-coming-soon). I’ve been making Biochar with it for about 8 months. It’s incredible! I highly recommend it!
What I learned after watching a video on Korean Natural Farming (KNF) is how good bone char is for gardening. So as an experiment, a put a small piece of hardware cloth over the stove, got some old cow bones my friend’s dog were no longer interested in, and cooked them over the open flame. Those bones are so thick and dense, I sometimes have to cook them twice. Then I break them up a bit, then put them in my Ninja Nutri-Bullet juicer and grind them to a fine powder. I mix that in with my compost.
I haven’t used the compost yet on my garden, but I have high hopes.
What scientific evidence can you offer to substantiate the claim of enhancement of it by earthworms?
All I can do is check Google Scholar!
check this https://www.researchgate.net/publication/329569267_Assessing_biochar_impact_on_earthworms_Implications_for_soil_quality_promotion
And this book
https://www.researchgate.net/publication/329482252_Bioremediation_of_Agricultural_Soils
Just like the best gin was made in bathtubs during prohibition, the best biochar can be made in bathtubs today. Instead of paying a small fortune for a kon-tiki style burner just go to your nearest recycler and get a used steel bathtub for a couple of bucks. start a fire in it and keep adding layers as the ash over until it is full. throw on a grate and barbeque supper when it gets full and then dowse with water after it is cooked. used small diameter material for the best results under 1 inch in diameter.
I converted a beer keg to make char from wood chips works great. Mix it worm bins garden gets better each year.
Thanks Steve for this fact based but readable article. I think we worm people should put bio hat in our tool box. I’m on this!!
Thanks Kathy!
Steve
Another excellent article that I have been looking forward to you presenting.
It puts many of the things I have read in terms I can understand.
The one question that still has me somewhat confused is what is the actual difference
between bio-char and regular BBQ charcoal and why wouldn’t it work just as well when
innoculated with worm tea ?
Thanks Again For Your Education Tutorals
Thanks for reading Frank! Regarding the difference between biochar and charcoal, I’m not sure how much this article helps sort it out, but it gives it a shot.
https://www.differencebetween.com/difference-between-biochar-and-charcoal/
Thanks for the info Steve. I have bio char in my compost and my worm bins. I have quite a bit of old limbs on my property. When the burn ban is lifted I’m going to create my own. I will be using the trench method. Great idea we the compost and castings tea. I’m going to try that as well.
Great article! I haven’t tried the biochar
Well dang! Are all of your blog posts this entertaining AND informative?! Clearly, I’ve been missing out! Really great work. Love the clever comedy interwoven throughout… really makes the content even that much more relatable. I’ll haveta read your posts more often when I see them in my inbox. Great stuff!
Thanks so much Etta! 🙂
We have an airline pilot turned science teacher. I found your article well researched and well written for all us biochar newbies.
Ha! You got it Tonda!
I’m all about DYI. but I can’t see me wrestling with a 30 gal drum and a 55 gal drum. Anyway to buy this and charge it yourself? That part I could do.
Yeah….it takes some doing, that’s for sure. And I hope to be offering both uncharged and charged biochar on the site soon!
Steve, I like your articles and interest in creating the best soil and worm situations. I have read other articles on biochar and watched many you-tubes on it. I feel like I would like to try the KonTiki if I were going to make my own, it is the easiest method in my opinion. Right now I gather the left over bits of wood charcoal from my campfires and if they are just perfect, they crush into tiny carbon and I innoculate them with worm castings, kelp and alfalfa meal, even dried out mushrooms I didn’t have the pleasure of eating. I add this to my garden and i suppose it is doing good. In the future I will aerate it with my Aquarium aerator for a day before I add it to the garden.
Thanks Penny! I like your process. 🙂
Can I use bought concentrate Worm Tea to charge my biochar?
Yes you can! 🙂
Thanks for the great post and for spreading the good word on biochar. You are such a great educator!
I would add that you don’t need anything special to make biochar (although those kilns are nice if you can gain access to them); biochar can be made in a hole in the ground. A 3 ft wide by 3 ft deep conical pit, for example, can process quite a bit of wood from your brush pile – up to 60 or more gallons. I use it in my worm bins all the time. If nothing else, it makes my vermicompost really black!
Thank you for a world class article on bio-char!
I’m lucky to have a horticulture supply distributor close to my home. Agricultural Charcoal, as they call it is, $35 for a very large bag. I’ve been using it in my organic container gardens (added to planting soil) for over a year now.
If I use bio-char in the Urban Worm Bag, with 1000 wigglers to start, is only a few grams recommended? I also heard on your live Wiggle Wednesday show to use up to 10% by volume (1/2 gallon). What amount of bio-char do you recommend for the UWB?
Yes, it will be best to keep any biochar added to a worm bin to a minimum. A few grams for starting sounds good. It would be best to add the biochar into the finished worm castings. Then it is guaranteed to be a home for purely beneficial microbes.
I want to charge my biochar in my worm bin (without using a percolator / worm tea).
Can I do it that way?
How long would I have to leave the biochar in my worm bin, for it to populate with microbiology?
Would I just leave it in a pile on top, and then take it out?
Thank you for any help.
Hey Eryk. In order for biochar to get properly charged, or inoculated, the material needs to be touching either solid or liquid form of vermicompost so that microbes can either migrate or grab on to the biochar. So it will need to be sprayed/soaked with vermicompost extract/ tea or mixed with equal parts or more solid vermicompost in order for microorganisms to populate the surfaces.
Great, informative article per usual Steve!